First attempt inverted nail application gel

SalonGeek

Help Support SalonGeek:

This site may earn a commission from merchant affiliate links, including eBay, Amazon, and others.

Tricky

Well-Known Member
Joined
Jan 10, 2006
Messages
1,562
Reaction score
87
Location
hertfordshire
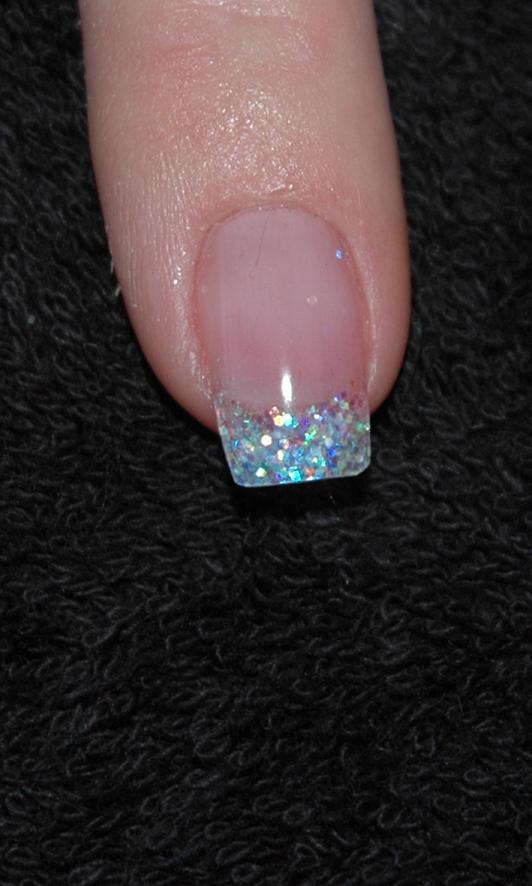
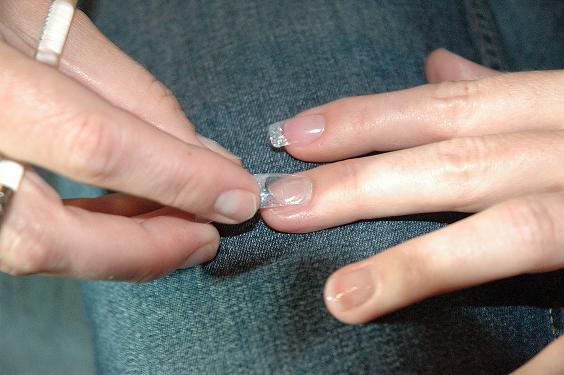
This is my first attempt at the inverted nail application using glitter mixed with clear gel and sculpting pink

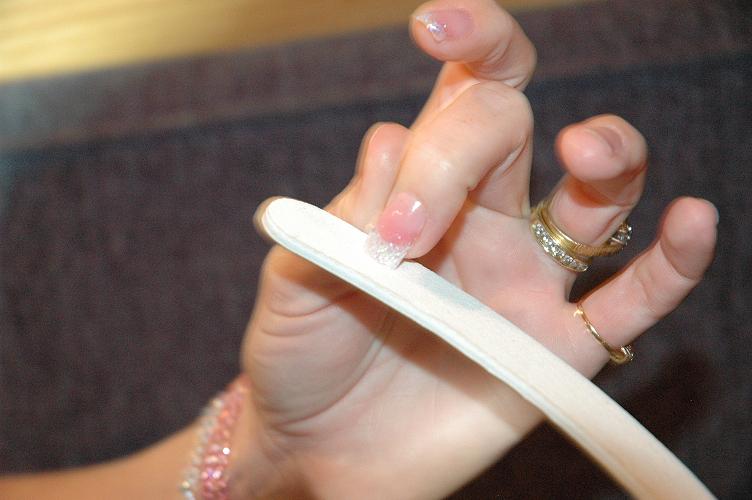
once the tip was placed and cured all i did was refine the shape of the free edge nothing else was touched with the file

all i can say is wow wow wow i love it and will now apply to the rest of my nails:):)
 

Attachments

  • first inverted glitter gel.jpg
    first inverted glitter gel.jpg
    65.3 KB · Views: 36,820
  • DSC_2483.jpg
    DSC_2483.jpg
    25.4 KB · Views: 2,033
  • DSC_2476.jpg
    DSC_2476.jpg
    21.8 KB · Views: 1,487
looks pretty.

so have you left the tip in place, or have you used the removable mould thingy ?

it will be really interesting to see how long they last.
 
Cool...it looks absolutely fab.....let us know about the longevity of it....so I am guessing you bought some of these moulds?

Did it take you long to do the one nail?
 
Cool...it looks absolutely fab.....let us know about the longevity of it....so I am guessing you bought some of these moulds?

Did it take you long to do the one nail?

i used a clear tip and it took me about 5 mins to apply the nail
 
i used a size two tip and turned it around if you try this you will find it fits perfectly hths
 
i used a clear tip and it took me about 5 mins to apply the nail
So did you apply the tip as normal or put the product on the underside of the tip and then apply over the whole nail?....did the product not stick to the tip?.....these things are confusing me now! lol
 
they are good aren't they !

I to am looking forward to how the last ie lifting etc, but guess the pressure you apply when putting the product on is far great than what we can achieve with a brush
 
i used a size two tip and turned it around if you try this you will find it fits perfectly hths
my brain is unable to compute! Think I need to see how you do it lol! So do you put the design on the inside of the tip, place it on the whole nail and cure? I'm repeating myself now but I don't get it lol!
 
my brain is unable to compute! Think I need to see how you do it lol! So do you put the design on the inside of the tip, place it on the whole nail and cure? I'm repeating myself now but I don't get it lol!
No!......no! Cathie, it's quite ok, you've saved me from repeating myself!:lol:

I've got the same question.
 
Here are a few more pictures you lot :lol:

Step 2 is just checking the pink will fit
 

Attachments

  • step 1.JPG
    step 1.JPG
    93.6 KB · Views: 1,375
  • step 2.JPG
    step 2.JPG
    67.4 KB · Views: 1,311
  • step 3.JPG
    step 3.JPG
    96.4 KB · Views: 1,264
  • step 4.JPG
    step 4.JPG
    91.3 KB · Views: 1,272
  • step 5.JPG
    step 5.JPG
    99.5 KB · Views: 1,674
  • step 6.JPG
    step 6.JPG
    79.5 KB · Views: 1,131
  • step 7.JPG
    step 7.JPG
    73.3 KB · Views: 1,287
  • step 8.JPG
    step 8.JPG
    74.7 KB · Views: 1,191
  • step 9.JPG
    step 9.JPG
    77.3 KB · Views: 1,292
  • step 10.JPG
    step 10.JPG
    74.9 KB · Views: 1,202
  • step 11.JPG
    step 11.JPG
    100.2 KB · Views: 1,206
oooooh you had that one up your sleeve didn't you!? :lol:

Thanks:wink2:
 
got a little refining to do to avoid lifting but so far so good xx
 
Wow
that was really good thanks for sharing do you think It would be possible with acrylic ?:hug:
 
Wow
that was really good thanks for sharing do you think It would be possible with acrylic ?:hug:

Tried it with acrylic the other day, but i am really rubbish with that system so gave up to soon but yes it is possible. I have just been playing so why not just play yourself :)
 
I am not convinced still atm how do you build a nice apex and what about air bubbles getting trapped under the tip ?
 
I am not convinced still atm how do you build a nice apex and what about air bubbles getting trapped under the tip ?

not looking to convince anyone just sharing my little experiment:) and i love them.
 
So did you file the end of the tip round to do zone 3?

What about applying a bonding layer of gel? I probably would've done that, so it'll be interesting to see how they hold up without it.

I really want to try it, but I've got some lovely glitter fades on at the moment that I'm not ready to part with. Hmmm no guinea pig in sight.

btw- They look great. The only thing I would say is the lower arch looks a little rough.
 
Thanks a lot for being the pioneer when i comes to the inverted nail art! :hug:
It,s really cool that you shared it with us!
It does look very easy to use... i am tempted to go and buy them myself and have a play with it aswell. The proces looks fun to apply them. Can i only ask how much they cost?

Thanks again for sharing and the step-by-step pictures!!!
 
All i used for the moulds were cheep clear tips turned the other way round

I have brought no special moulds for this application
 
So did you file the end of the tip round to do zone 3?

What about applying a bonding layer of gel? I probably would've done that, so it'll be interesting to see how they hold up without it.

I really want to try it, but I've got some lovely glitter fades on at the moment that I'm not ready to part with. Hmmm no guinea pig in sight.

btw- They look great. The only thing I would say is the lower arch looks a little rough.


yes i applyed a thin bonding layer of gel to the nail plate cured before applying the tip hths

yes still working on my lower arch
 

Latest posts

Back
Top