Back by popular demand.I hope it will stay here for geeks who struggle with Form placement.
FORM PLACEMENT GUIDELINES
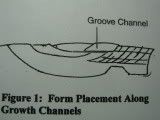
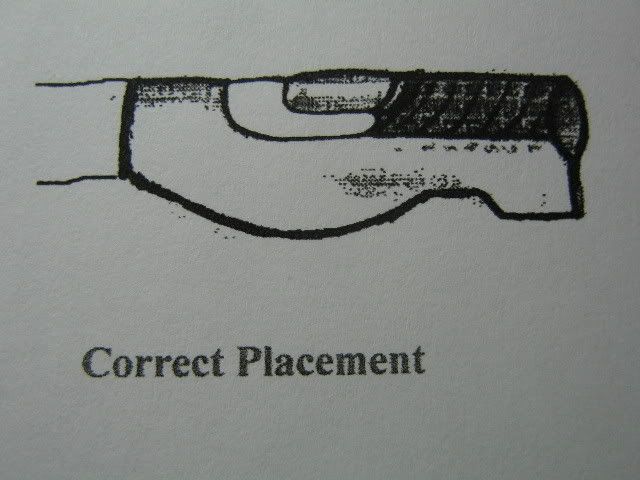
The grooves or growth channels of the nail plate
are the guide lines for placing the form, not the free edge
or the hyponychium.See figure 1. This is the most
important aspect of form placement. If you cannot
sculpt your product out onto the form without
creating an edge where the form meets the line of
the growth channel, the supports of your sculpted nail will not provide the structural
strength needed for your work to stand up in your clients real life routines.
The nail form needs to follow the flow of the natural growth pattern of the natural nail you
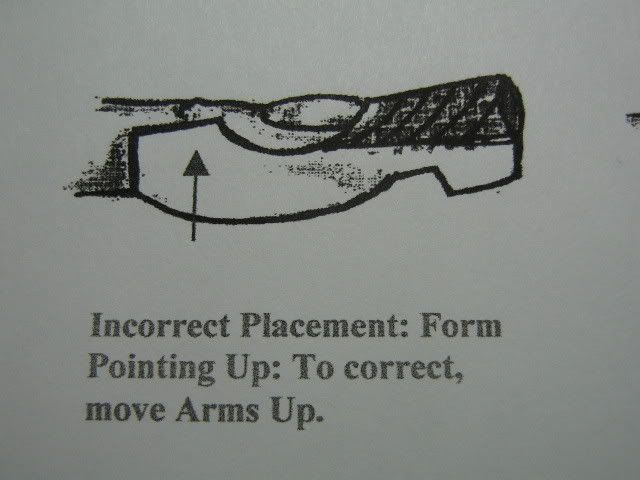
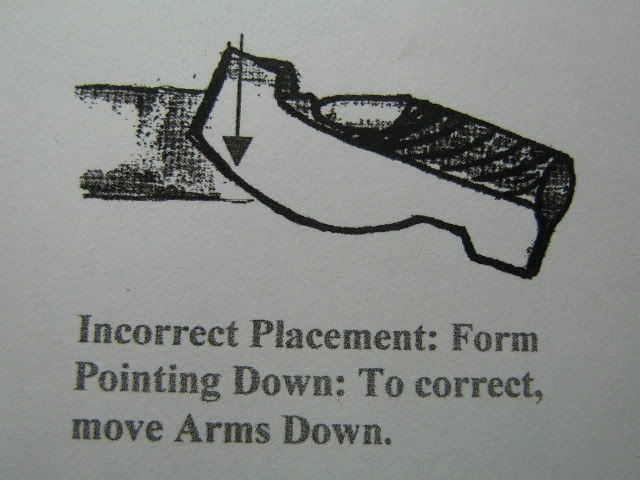
are sculpting the extension for. Looking at the form placement from the side view evaluate
if the tip of the form is too far up or down. To correct the placement, simply move the
arms of the form in the direction of the correction. If the tip of the form points up, move
the arms up. If the tip points down, move the arms down. See Form Corrections
The form needs to sit parallel and even with the growth channels. You will use the lines of
the growth channels to judge the width of your sculpted extension, not the lines on the nail
forms. Refer to figure 1. When you depend on the lines of the form instead of the lines of
the natural nail , the possibility of a crooked nail application increases.
To Place Your Form
1. Taking one form at a time from the roll, hold the form with one or two handgrip.
2. Create a curve in the form that matches that of the natural nail plate or the curve
you wish to create. When a natural free edge exists use it to place the form under
while lining the arms up in a parallel position with the growth channels.
3. When there is no free edge to guide your placement, imagine where the
hyponychium track would be to place the oval edge and concentrate your focus on
lining up the arms in a parallel position with a growth channels, it is expected to
have skin of the fingertip showing between the form and the growth channel, you
will use the skin to build the support of the sculpted nail onto.
4. With a firm but gentle grip center the oval edge and lay the arms in the parallel
position to accommodate the growth channels. Gently move the arms up or down
to establish the curve of the sculpted extension. Press the arms of the form to the
sides of the finger for a snug fit.
5. Check the fit by looking ndown the barrel to the form and fingernail.If you can
look into the growth channels all the way to the cuticle, the form is well placed. If
you see the form above the growth channel , you will have a step when you
remove the form.
6. When you are satisfied with the position of the nail form, finish your placement
procedure by pinching the end tabs securely together.
CUSTOMIZING NAIL FORMS
On occasion you will find that a form does not fit and some adjustments are required.
The following are examples of potential challenges and their solutions.
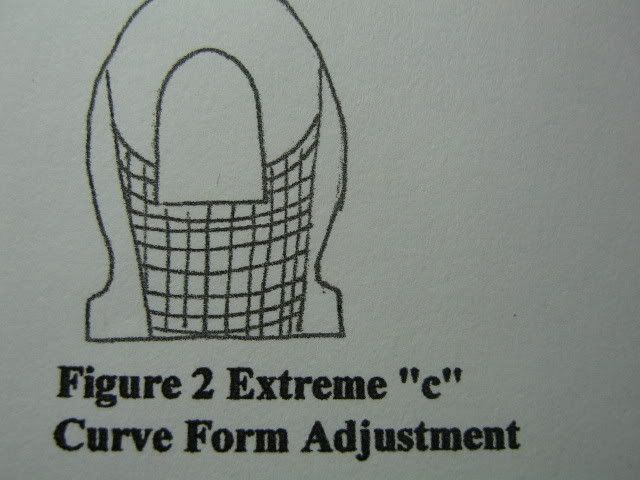
Extreme Natural C Curve. It can be very challenging task to
fit a form to the growth channels of a client who has a strong C
curve. The solution is to make the necessary adjustment
by squaring the curved contact point of the form as illustrated in Figure 2.
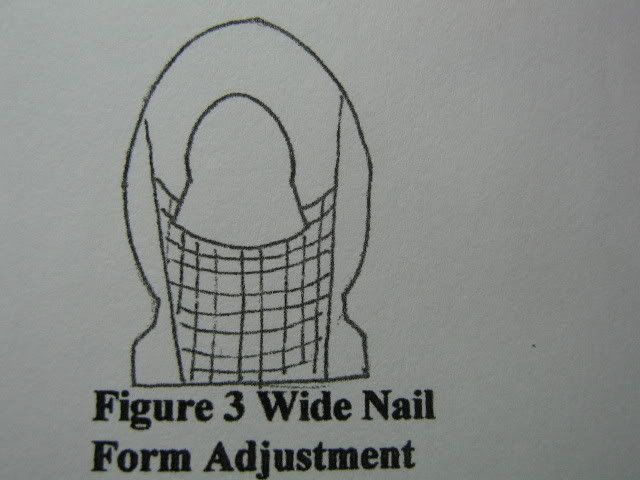
Wide Nail. Generaly the thumb. When you are dealing with an
extremely large nail or a hammer thumb, you will find that the
nail form will not fit under the free edge and you will have
difficulties balancing the form into the growth channels.The
solution is to widen the curved contact point of the form by cutting
the form to a suitable depth as illustrated in Figure 3.
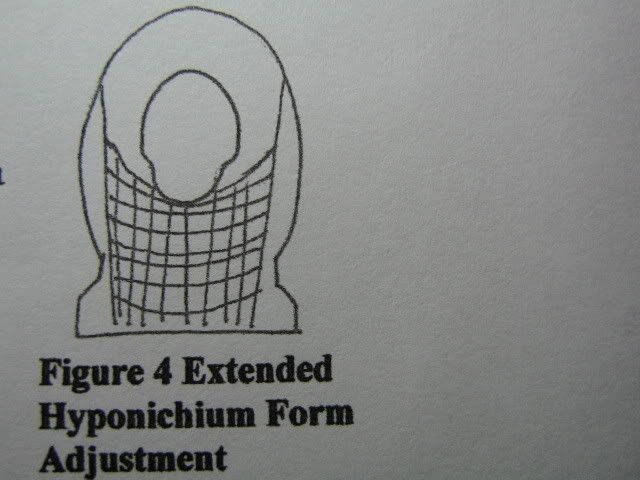
Extended Hyponychium Growth. When you encounter a client who
finds the forms very uncomfortable and pinching , they most likely
have hyponychium overgrowth. The solution is to create a proper
fit and reduce the stress causing pressure by cutting in a deeper
curved indentation at the contact point of the form as illustrated
In Figure 4.
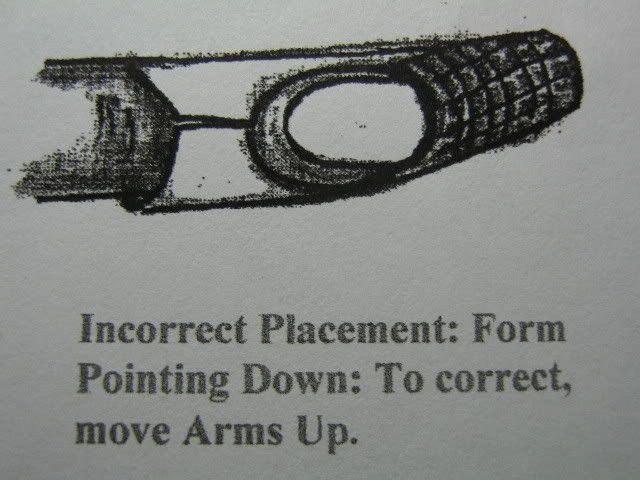
FORM CORRECTIONS
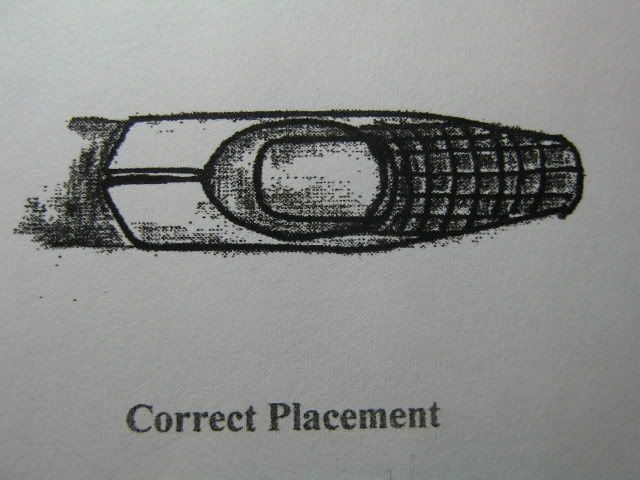
FORM PLACEMENT GUIDELINES
The grooves or growth channels of the nail plate
are the guide lines for placing the form, not the free edge
or the hyponychium.See figure 1. This is the most
important aspect of form placement. If you cannot
sculpt your product out onto the form without
creating an edge where the form meets the line of
the growth channel, the supports of your sculpted nail will not provide the structural
strength needed for your work to stand up in your clients real life routines.
The nail form needs to follow the flow of the natural growth pattern of the natural nail you
are sculpting the extension for. Looking at the form placement from the side view evaluate
if the tip of the form is too far up or down. To correct the placement, simply move the
arms of the form in the direction of the correction. If the tip of the form points up, move
the arms up. If the tip points down, move the arms down. See Form Corrections
The form needs to sit parallel and even with the growth channels. You will use the lines of
the growth channels to judge the width of your sculpted extension, not the lines on the nail
forms. Refer to figure 1. When you depend on the lines of the form instead of the lines of
the natural nail , the possibility of a crooked nail application increases.
To Place Your Form
1. Taking one form at a time from the roll, hold the form with one or two handgrip.
2. Create a curve in the form that matches that of the natural nail plate or the curve
you wish to create. When a natural free edge exists use it to place the form under
while lining the arms up in a parallel position with the growth channels.
3. When there is no free edge to guide your placement, imagine where the
hyponychium track would be to place the oval edge and concentrate your focus on
lining up the arms in a parallel position with a growth channels, it is expected to
have skin of the fingertip showing between the form and the growth channel, you
will use the skin to build the support of the sculpted nail onto.
4. With a firm but gentle grip center the oval edge and lay the arms in the parallel
position to accommodate the growth channels. Gently move the arms up or down
to establish the curve of the sculpted extension. Press the arms of the form to the
sides of the finger for a snug fit.
5. Check the fit by looking ndown the barrel to the form and fingernail.If you can
look into the growth channels all the way to the cuticle, the form is well placed. If
you see the form above the growth channel , you will have a step when you
remove the form.
6. When you are satisfied with the position of the nail form, finish your placement
procedure by pinching the end tabs securely together.
CUSTOMIZING NAIL FORMS
On occasion you will find that a form does not fit and some adjustments are required.
The following are examples of potential challenges and their solutions.
Extreme Natural C Curve. It can be very challenging task to
fit a form to the growth channels of a client who has a strong C
curve. The solution is to make the necessary adjustment
by squaring the curved contact point of the form as illustrated in Figure 2.
Wide Nail. Generaly the thumb. When you are dealing with an
extremely large nail or a hammer thumb, you will find that the
nail form will not fit under the free edge and you will have
difficulties balancing the form into the growth channels.The
solution is to widen the curved contact point of the form by cutting
the form to a suitable depth as illustrated in Figure 3.
Extended Hyponychium Growth. When you encounter a client who
finds the forms very uncomfortable and pinching , they most likely
have hyponychium overgrowth. The solution is to create a proper
fit and reduce the stress causing pressure by cutting in a deeper
curved indentation at the contact point of the form as illustrated
In Figure 4.
FORM CORRECTIONS