nutsaboutnails
Member
hiya gang,
I have recently qualified at college and all was well on the nail front until recently, I put a set of silk on my friends nails and they lasted 2 days, she always has silk put on and they last anything upto 4 weeks!!! but she explained to me that the nail technician she has uses sheets of proper silk, not the cut and stick sort!!. So off I trundle to John lewis to buy some, I tried again and only 2 lifted around the edges but I dont know why as I didn't touch the skin, they lasted about 10 days though??. I wonder if I am applying the silk correctly, at colledge we were taught cut and stick silk - not proper sheeted material. I use EDGE (alida) cut and stick silk.
When I put 1 layer on they didn't stay on, but when I put 2 on they looked too thick you could still see parts of fabric underneath??????
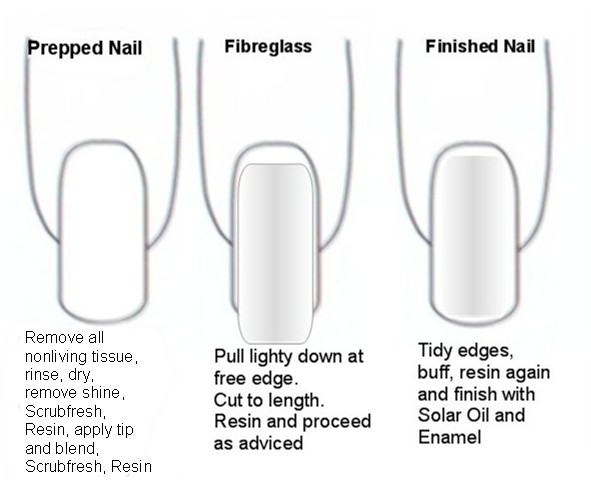
I am applying resin to the natural nail then holding a strip of the silk on then activating then re-applying resin x2 then filing off excess silk. I find it alot easier with cut and stick silk but it just WONT stay on!!! ANY IDEAS????
I am also having a few probs with GEL chipping off natural nail, I use millenium and sometimes star nails, I have a friend whos nails I did last night - she is coming back tomorrow as all the gel has chipped / peeled off???????? ANY IDEAS????????? I am thinking of purchasing an NSI gel??
SORRY ABOUT THE LONG ESSAY I HAVEN'T USED THE FORUM BEFORE AND I HAVE LOTS OF QUESTIONS / PROBLEMS
thanx for all your time!!
I have recently qualified at college and all was well on the nail front until recently, I put a set of silk on my friends nails and they lasted 2 days, she always has silk put on and they last anything upto 4 weeks!!! but she explained to me that the nail technician she has uses sheets of proper silk, not the cut and stick sort!!. So off I trundle to John lewis to buy some, I tried again and only 2 lifted around the edges but I dont know why as I didn't touch the skin, they lasted about 10 days though??. I wonder if I am applying the silk correctly, at colledge we were taught cut and stick silk - not proper sheeted material. I use EDGE (alida) cut and stick silk.
When I put 1 layer on they didn't stay on, but when I put 2 on they looked too thick you could still see parts of fabric underneath??????
I am applying resin to the natural nail then holding a strip of the silk on then activating then re-applying resin x2 then filing off excess silk. I find it alot easier with cut and stick silk but it just WONT stay on!!! ANY IDEAS????
I am also having a few probs with GEL chipping off natural nail, I use millenium and sometimes star nails, I have a friend whos nails I did last night - she is coming back tomorrow as all the gel has chipped / peeled off???????? ANY IDEAS????????? I am thinking of purchasing an NSI gel??
SORRY ABOUT THE LONG ESSAY I HAVEN'T USED THE FORUM BEFORE AND I HAVE LOTS OF QUESTIONS / PROBLEMS
thanx for all your time!!