L&P Fade, French... and 3d....

SalonGeek

Help Support SalonGeek:

This site may earn a commission from merchant affiliate links, including eBay, Amazon, and others.

VHunter

Well-Known Member
Joined
Oct 17, 2005
Messages
8,649
Reaction score
626
Location
Cornwall, Ontario, Canada
Hi everyone

Ok, here goes.... critique away!!! Let me have it, both barrels.:green:
I have now done a total of 6 sets of L&P so far.
I've added several pics to this critique, as opposed to opening a gazillion threads LOL
I won't get into where I "Know" I goofed.... no point. I know I did.. LOL And I know you'll call me on it. It's ok.... learning process with L&P and all that.
I'm STILL struggling a great deal with consistency with my beads AND with the speed at which L&P sets, versus being able to "faff around" with gel till it's what I want.... with time I'll get it, right?

Ok, here goes...
Pic at right is a sculpt.

This terra cotta fade with dried flowers is an NNO (and her nails have a naturally high apex and a super sharp c-curve to DIE for)

IMG_150LPcolourfadeanddriedflowerss.jpg


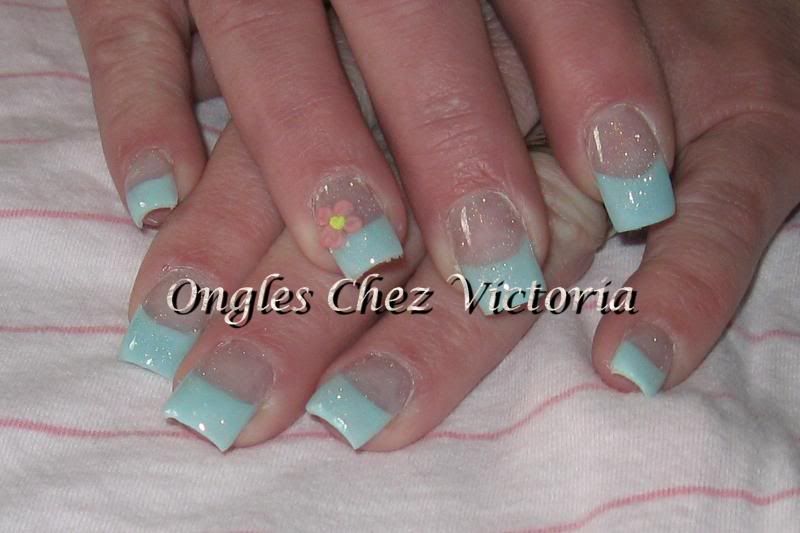
Two toned NNO french with Aqua marine & italian ice


IMG_194AquaMarineandItalianiceNNOFr.jpg


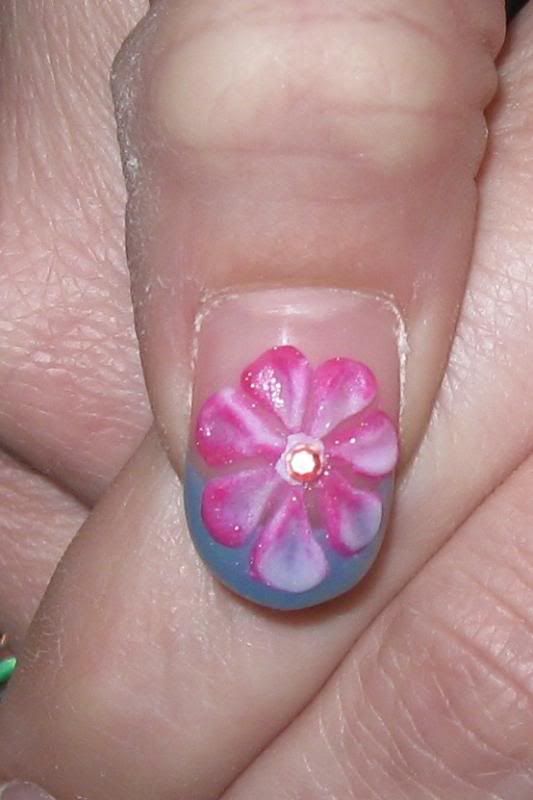
Very sad oval shape:lol: with 3d flower

IMG_2083dpinkfloweronthumb.jpg
 
Hi!
I wont leave a critique since I don´t feel experienced enough, but I think they look great!
I have the same problem, learned gel first and was used to be able to do the smile over and over until I cure it.
L&P is quite different don´t you think?:lol:
Anyways, great job and keep it up and you´ll have both down in notime!
 
Hey V - on the whole a decent job! I know I can be 'to the point' and you not take offence so....... The french sculpts are lacking in consistency - your white looks marbled (maybe working too wet?) and some of your smiles lack ears!

The NNO set look lovely, love the colour and the flowers.

The Aqua set look a bit flat, lacking in an apex.....

On all sets your zone 3 looks lovely, very flush. Good product control.

Overall, your're on the right track and I'm sure I haven't told you anything you don't know already!! Keep on it and it will get easier, honest!

Nice one V xx
 
Thanks!!

And yes, PLEASE BE STRAIGHT UP AND TO THE POINT!!
LOL no sense in bothering posting for a critique if no one's going to critique.

As for those thinking they lack experience enough to critique... baloney :hug: You have eyes in your head, know what looks good... and what doesn't. By all means, please critique.k

Ok.. yes, had a problem with the apex. I definately agree that they're flat. Mainly because at the moment, I'm a tad confused due to what my instructor said.... but am leaning towards following what you guys do, and getting back to how I did it before. Not that I think she's terrible... but... I have to disagree with her about a few things... figuring that you guys know better since the us & uk have standards where canada does not.
Also.. product control.... soooooo difficult!! lol

The 'white' french isn't white at all. I 'think' it was pansy, but I could be wrong. I know it was a pinky lavender. But I did find when applying it, the colour didn't look 'true' in the bead? Like you said, kind of marbled?

I also find when filing, I get some 'grey' spots... but someone said that with colours, I have to cap with clear or that happens?

Thanks re: zone 3! That one was TORTURE because I was afraid to touch skin and keep avoiding it, but am finding that sometimes, I have no choice?? and I don't think I'm pressing hard enough still. At least not with consistency? I think I need to be firmer.

Yes... my ears are missing LOL again, chalk it up to my 'course' and my 'teacher' where the french's were straight :confused:. At one point, she humoured me (because I kept giving my french's smiles) and said "Here, I'll do this one curved, just for you". :rolleyes:

I 'think' I've seen you guys do the french, THEN add teensy beads to make the ears? Is that right? Did that make sense?

Thanks a million Vetty!!
 
i think these nails are FAB, my only critique is the tidying up of edges of the white french, they don't seem quite flush with the sidewalls but only slightly off. And on the blue/aqua tip i can see that maybe there is a few bits undr a couple of the tips that could do with getting out with the file.
however, you're work is really good and it looks like youre well on track
hth xxx
 
I would say that you need more consistency in your smile lines in the picture with the aquamarine french. some smiles are fairly straight and others more bended. as mentioned before they look a bit flat. Maybe you could try to pinch the nails next time to get a more slender look and a nicer curve to them. I don´t know if it is the picture but on the top picture i think you could have putted a bit less product on the free edge since they look slightly a bit bulky.

I know that it isn´t easy to go from one technique to another. Hope my comment makes sense to you :hug:
 
Consistency is one of the most difficult things to achieve especially when you are doing something different each time. :green:

Now I know you love nail art Victoria but I really think that you are trying to do too much too soon. I feel it would go better for you if you stuck to good old French pink & whites until you master the smiles and the product placement etc. You need to get into a routine and a rythm and then you can tackle the fun stuff in the same way. I really think it would be better for your progress.

For 3D you can practise that on a tip anytime until you are feeling more confident with the mix and the set time etc.

As a teacher with your best interest at heart, that is my advise. I love your enthusiasm and hard work and it will pay off just like it did in your early days using gel. Just remember it is early days nd your are trying to run whilst you are still a toddler so to speak. Master the basics and the rest will follow. Trust me about this. When I see gorgeous pink and whites we'll know you're on the right road. :hug:
 
Last edited:
thanks everyone!!

Geeg... you know I love you, doll :green::hug:
And you know I respect your opinion and I do agree, you're quite right. Consistency requires I do the same thing over and over and over.
That's true in everything.

However, one slight problem: only one of all my clients actually wears pink & whites. I only see her every 2wks and she's not convinced of the difference between mma and quality acrylic and so she won't convert from gel to L&P no matter what I say (she's stubborn LOL)

Sooooooooooooooo that means the only pink and whites I can practice are on tips LOL and for the record (and everyone's amusement)...... that's exactly what I was doing earlier today :lol:
 
ok....i think if you are going to be using colour the best advice i can give you...which was given to me is to remember to use it thinly as you can get away with but get the coverage you need.....do not build your structure with it at all....coloured/glitter powders are just for colour and design....i ALWAYS cap and build in clear....plus the glitters are more expensive so will last you longer this way.

with the fade i think to get it better you could just use one small bead in zone one (in the centre) and press it out evenly to both sides then with the very tip of your brush go from one side to the other lightly feathering it down towards the cuticle.....i think you will get a more even fade this way. hope that makes sense to you, lol!

aquamarine and itailian ice are not 2 powders i would have used to be honest as aquamarine is a heavily pigmented powder and italian ice is based in clear if i remember correctly....this would explain why you would be getting grey patches etc...but i cant see how you did those ones clearly...if you explain how you did them then may be able to help
your 3d flower lovely as it is, i think would look alot better on the smaller side, IMO. Also i would stick stones in the centre with your resin...or use clear powder.
your enthusiasm and determination to do something always amazes me victoria!!
i hope what i have said helps you in some way
xx
 
ok....i think if you are going to be using colour the best advice i can give you...which was given to me is to remember to use it thinly as you can get away with but get the coverage you need.....do not build your structure with it at all....coloured/glitter powders are just for colour and design....i ALWAYS cap and build in clear....plus the glitters are more expensive so will last you longer this way.
Thanks!!
with the fade i think to get it better you could just use one small bead in zone one (in the centre) and press it out evenly to both sides then with the very tip of your brush go from one side to the other lightly feathering it down towards the cuticle.....i think you will get a more even fade this way. hope that makes sense to you, lol!
Yes, this made sense:green:

aquamarine and itailian ice are not 2 powders i would have used to be honest as aquamarine is a heavily pigmented powder and italian ice is based in clear if i remember correctly....this would explain why you would be getting grey patches etc...
Ummm I'm not sure I understand why not? White & clear are used all the time, and very different? And it was on the pinkish one that I got the grey patches (the one everyone thought was white LOL) and the aqua, I did use a super thin coat of clear over top BUT I'll remember what you said above for next time :green:

but i cant see how you did those ones clearly...if you explain how you did them then may be able to help
It's an NNO, the aquamarine french done first, then the italian ice over zones 2 & 3, and lightly pulled over 1, just to get some sparkle on it. Then a super thin coat of clear over top.

your 3d flower lovely as it is, i think would look alot better on the smaller side, IMO.
I agree!! But still struggling with size of my balls (WHOOPS... I mean beads LOL I keep saying balls all the time HAHAHAHA)

Also i would stick stones in the centre with your resin...or use clear powder.
your enthusiasm and determination to do something always amazes me victoria!!
i hope what i have said helps you in some way
xx

Thanks!! and you've helped tonnes. Thanks for the compliments
:hug:
 
Thanks!! and you've helped tonnes. Thanks for the compliments
:hug:

no worries... i wasnt sure if you had mixed the power for the free edge as i saw it had a sparkle in it... the way you did it is fine...you probably just filed off some of the top layer of clear as you say u just used a super thin layer.....i would have probably used a bit more and built the structure with it.
 
as above BUT one thing I can notice (and I am so glad you didn't oil the crap out of them like many do).
You have a weakness on the right hand side (all the cuticles have more dust on this side).
Changing from one grip (from one side) to another grip (for the other side) is quite difficult.

You gotta kinda learn to "flick" the file around this area, it's quite common and a difficult one to master (I feel a video coming on).

Kudos to you Victoria for posting, (no offense), but you are an old dawg learning new tricks :) ..... (a figure of speech).

But you can teach em, just last week my dog was pooing on the mat in front of the balcony door (inside), every night I have been throwing her ball onto the balcony for playtime .

I was rewarded this morning with a nice job on the balcony (outside) .... I was so proud ..... she is 9 years old in 10 days (that's 63 in human years apparently).

Just a comparison of teaching something new .....

It's fabulous you are using so many different mediums, when many techs do only one.

Acrylic is so different to gel (so is tip 'n' dip) fibreglass etc, well done for taking on something new and posting your progress.
 
answers inserted below

as above BUT one thing I can notice (and I am so glad you didn't oil the crap out of them like many do).
errrrrmmmm:o and we both know that I usually do LOL This time I tried to make a concentrated effort so that all my sins were revealed LOL

You have a weakness on the right hand side (all the cuticles have more dust on this side).
Changing from one grip (from one side) to another grip (for the other side) is quite difficult.
YES!! I have a VERY difficult time doing the client's left hand (my right). I always seem to be asking them to turn their body facing to their left, almost sitting sideways to get their arm 'straight' on the table. It's a struggle and I'm not sure how to make it easier on myself. It's more with the filing than with applying the product... and if I can't get the right angle... I find I don't get the nails straight... etc... :cry:

You gotta kinda learn to "flick" the file around this area, it's quite common and a difficult one to master (I feel a video coming on).
Yes!! Please do... I don't understand "flick"??

Kudos to you Victoria for posting, (no offense), but you are an old dawg learning new tricks :) ..... (a figure of speech).
Ummmm thanks? LOL (coming up on my 38th bday in 6days... a tad sensitive about the 'old' word...)

But you can teach em, just last week my dog was pooing on the mat in front of the balcony door (inside), every night I have been throwing her ball onto the balcony for playtime .
Sooooo I'm not pooing on the floor anymore? :lol: HAHHAHAHA
I know, I get what you mean LOL

I was rewarded this morning with a nice job on the balcony (outside) .... I was so proud ..... she is 9 years old in 10 days (that's 63 in human years apparently).

Just a comparison of teaching something new .....

It's fabulous you are using so many different mediums, when many techs do only one.
Acrylic is so different to gel (so is tip 'n' dip) fibreglass etc, well done for taking on something new and posting your progress.
Most of my life, I've left things uncompleted... Highschool (to later get GED), Secretarial (hired out of my course, 1mth before getting diploma), a book that is collecting dust that I was writing(some examples, list goes on). And I've never been 'tops' at anything.. "Jack of all trades and Master of none". Just this once I want to FINISH something. I want to excel and be tops and learn all I can. The techs that I most respect and who's skill level I aspire to are learned in all the systems. If I want THEIR respect and want to achieve my utmost best, then I can only do as they have done, and learn all that I can DESPITE the limitations imposed. My plan is a year from now, tackle 'wraps'. (but not sure how, as it's not taught anywhere locally). At some point, I want to be able to count myself 'among' the best, or at least stand really close by.
Thanks Carl :hug:
 
But you can teach em, just last week my dog was pooing on the mat in front of the balcony door (inside), every night I have been throwing her ball onto the balcony for playtime .
I was rewarded this morning with a nice job on the balcony (outside) .... I was so proud ..... she is 9 years old in 10 days (that's 63 in human years apparently).

PS: I'm going to send my 15yr old Pekingese to you.... he's started this habbit of BARKING ALL NIGHT LONG that no matter what I do, or how consistent I am, he doesn't stop. It's a year now... and I'm at my wits end :eek: (going through piles and piles of earplugs too, to sleep)
And he's apparently 103yrs old LOL

(I think the dog years thing changes from the different sizes of the breeds? from multiples of 6 to 9, smaller dogs usually being multiples of 9)
 
Lmao at Carl!!
Well done for posting V but try doing one thing at a time....work on your P&W and get your smiles right and maybe extend nailbeds if possible? Work on getting everything where it should be and THEN try some colours and fading.
We all have trouble on one side of the nail when starting out mate so make sure you place the client where you need them to be, believe me, If Ant had trained you he would make this VERY important that you learn!! By making sure he shows me whenever he does my nails:)
Keep posting the pics..you're coming on leaps and bounds x:hug:
 
Thanks Judy!!

AS A MATTER OF FACT.... I have managed, with phone calls.... to dig up a nail biter (of horrendous portions) to come Friday morning for a P&W where I WILL have to extend the nail bed. I will be sure to take before and after pics!!

I know it will be a struggle.... not much to work with and small plates make for a bigger challenge.
BUT looking forward to it.k


thanks again hun (ps: be sure to harass Ant into coming to Montreal. I can give him the name of my school. Maybe he can harass them into having him as a guest and doing a special course....????)

xoxox
 

Latest posts

Back
Top