


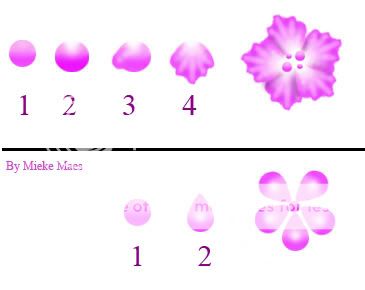
For the first flower:
1. you start by applying a small bead of acrylic on the nail. This should by drier then how you would normally work. The bead is easier to control + maintain it, shape if it,s a bit drier.
2. start by applying some presure with your brush on the acrylic bead at the side where you want to create the center of your rose.
3. Apply pressure with the side of your brush in 3 or 4 different directions away from the center. Don,t push to hard or you push the acrylic to much outward so the petal would lose it,s shape.
4. When this is done your petal should like like the image on nr 4.
5. repeat this and try to overlap the petals to give it more effect.
You can finish with a rhinestone or glass beads in the center.
The second flower:
1.The same as nr one of the first flower.
2. drag the acrylic bead to one side with the tip of your brush. Try to stay in the top layer of the acrylic while you create the drop to keep it smooth. You basically drag the toplayer of acrylic downwards while you move your brush to create the drop.
For some more complicated 3D flowers, here a step-by-step of a 3D rose that I did for a swedish magazine
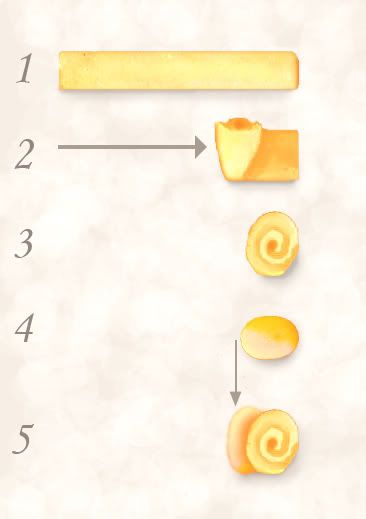
1. Pick up a small wet ball of coloured acrylic and place it on a piece of plastic/nail form.
Drag the acrylic evenly to one side with your brush to create a line.
2. Wait until the acrylic starts to set, making sure that the acrylic is still flexible.
Then lift up the acrylic line that you created, with a needle or toothpick and start to
roll it inwards to the opposite side from where you started. This becomes the centre of your rose.
3. Place a small ball of the same colour acrylic on the nail and place the centre of the rose on top of it.
It has to be held straight until the acrylic sets and the centre stays in place.
4. Take a small ball of the coloured acrylic and flatten it on the plastic/nail form in a
round or oval shape.
Wait until the acrylic starts to set, making sure that the acrylic is still flexible.
5. Place a small ball of the coloured acrylic to the side of the centre of your rose.
Pick up the small still flexible part of coloured acrylic and push it against the centre where you applied the previous ball of coloured acrylic.
Hold it in place until it sets and stays in place.
Repeat nr 4 & 5 until your rose reaches the desired size. You can shift in colour to make the flower petals (nr4) so your finished rose will have different shades.
Hope this was of any help :wink2:
Last edited by a moderator:
")